How to Fix All Local User Accounts Missing from the Login Screen
The login screen might only show “Other User” instead of the usual list of local accounts, so you can’t just click your profile to log in. This happens because Windows can’t show the local user accounts when you start your computer. Usually, this is caused by a setting in Group Policy that hides all local users.

Other reasons can be accounts being turned off, user profiles getting damaged, or some settings in the registry being wrong.
Before proceeding, remember that you can use solution 1 or 2 to log in to the system (or use a domain/Microsoft account if one is available), then try the other solutions to fix the issue permanently. Once you’ve logged in, see if fully shutting down and restarting your PC (after properly signing out) resets any glitches.
If you’re part of a domain network, make sure that your organization’s security policy is not causing this issue. Also, check that no security product used for login control (such as Duo 2FA) is causing the problem. Finally, make sure all user accounts have passwords (including guest accounts) and check that they appear at “\users” (you can go there using the Run box).
1. Log In Using the Other User Option
You might be able to log in through the “Other User” option by manually entering your username (sometimes with a backslash). Once logged in, you can follow additional solutions for a permanent fix.
- Select the Other User option and press the backslash key (\).
- Type your user name after the backslash (like \[User name]) and enter your password or PIN. For example, if your username is XYZ, type \XYZ in the username field.

Enter the Username after the Backslash - Press Enter and see if you can log in successfully.
- If that doesn’t work, try entering your PC Name before the backslash, followed by your user name, like this: [localmachinename]\[localaccountname]. For example, if your PC name is ABC and your user name is XYZ, type ABC\XYZ.
- If you log in successfully, repeat this for all other local users (sometimes Windows updates are applied to each profile). Then check if all local accounts appear on the login screen.
If you are on a domain or Azure AD, try using your domain or Azure AD name, followed by the backslash and your username (e.g., AzureAD\Name).
2. Use the Advanced Recovery Options
If the “Other User” option doesn’t work, you can try advanced recovery options, such as startup repair or booting into safe mode.
2.1. Startup Repair
- Force-shutdown your PC three times. On the third restart, you should see the Troubleshoot screen.

Open Troubleshoot in Advanced Startup Menu - Open Advanced Options and select Startup Repair.

Open the Startup Repair - Follow the instructions on your screen and see if this solves the login problem.
2.2. Safe Mode
- Boot your system into safe mode (Troubleshoot > Advanced options > Startup settings).

Boot Your System into Safe Mode - Once your system starts in safe mode, try the other solutions outlined in this article.
2.3. Use Command Prompt to Enable the Built-in Administrator Account
- If safe mode doesn’t help, boot into recovery mode (as described above) and open Command Prompt (Troubleshoot > Advanced options).

Open Command Prompt in the Advanced Options - Type the following command and press Enter:
net user administrator /active:yes

Activate the Built-in Administrator Account Through the Command Prompt - Restart your PC and see if you can now log into the local administrator account. If so, use this account to try the other fixes in this article.
3. Disable Fast Startup on Your PC
This issue might happen if Fast Startup is turned on, because it can sometimes cause the system to skip important system checks. Turning off Fast Startup can help.
- Press the Windows key and, in the search bar, type Power Options. Select Power & Sleep settings.

Open Power & Sleep Settings - On the right, click Additional power settings, then click Choose what the power buttons do.

Open Choose What the Power Buttons Do - Click Change settings that are currently unavailable, then turn off Turn on Fast Startup.

Disable Fast Startup - Save your changes and restart your PC to see if the issue is fixed.
If your accounts are still missing, try switching your graphics card in BIOS from integrated to dedicated, or vice versa.
4. Add the User to the Administrator Group
If local user accounts are not part of any user group (possibly due to a glitch), they may not show up. Adding the users to an appropriate group can solve the problem. Before proceeding, make sure that no user is only added under Settings > Accounts > Access Work or School (you can add them under Other Users).
- Right-click the Windows button and select Computer Management from the menu.

Open Computer Management - In the left pane, expand Local Users and Groups and select Users.

Double-click on Your User Account in Local User and Groups - Double-click a problematic account.
- On the General tab, make sure the account is not disabled. Then go to the Member Of tab.

Uncheck Account is Disabled - Check if the account is a member of a group, and whether it’s an Administrator group.
- If it’s not a member of the Administrators group, click Add and then Advanced.

Click on Add in the Account’s Property Window - Click Find Now, then double-click Administrators.

Add the User to the Administrator Group - Click Apply/OK, and repeat this for other problematic accounts.
- Restart your PC and check if the accounts are visible again. If so, make sure each user is assigned to their proper group.
You can also do this using the command prompt (opened as administrator) by running:
net localgroup "Administrators" [Computer Name]\[Missing User] /add
If accounts are still missing, you might need to create a new user account and transfer your data.
5. Use the Group Policy Editor
You may face this problem if your group policy settings are not correct. Fixing the relevant group policy may resolve the problem. Users on Windows 10 Home will first need to install the Group Policy Editor.
Press the Windows key, type Group Policy in the search box, and select Edit Group Policy.

Now follow these configuration steps:
5.1. Enable ‘Enumerate Local Users on Domain-Joined Computers’
- Go to:
Computer Configuration >> Administrative Templates >> System >> Logon
- Double-click Enumerate Local Users on Domain-Joined Computers and set it to Enabled. Click Apply.

Double-Click on Enumerate Local Users on Domain-Joined Computers - Also make sure Hide Entry Points for Fast User Switching is Disabled (or Not Configured).
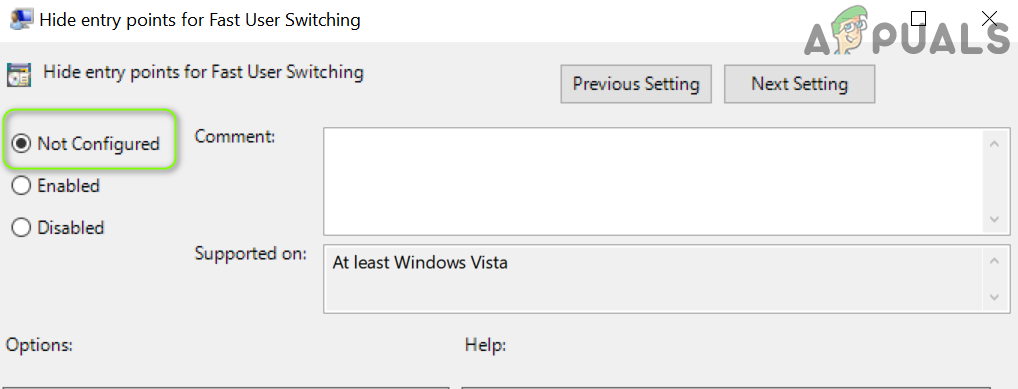
Set Entry Points for Fast User Switching to Not Configured - Close the Group Policy Editor and log out.
- Restart the PC and see if missing accounts appear on the login screen.
5.2. Edit the Security Options
- Go to:
Computer Configuration >> Windows Settings >> Security Settings >> Local Policies >> Security Options
- Double-click Interactive Logon: Don’t Display Last Signed-in and set it to Enabled.

Enable Interactive Logon: Don’t Display Last Signed-in - Click Apply/OK, then reboot your PC to check for the accounts.
- If not resolved, go back to Security Options in Group Policy Editor and double-click Interactive logon: Display User Information When the Session is Locked.

Open Interactive logon: Display User Information When the Session is Locked - From the dropdown, select Do not display user information and click Apply/OK.

Select Do Not Display User Information - Enable Interactive Logon: Do not display last user name (if applicable), then close the Group Policy Editor.
- Restart the PC to see if the accounts are back.
5.3. Edit Windows Logon Options
- Navigate to:
Computer Configuration > Administrative Templates >> Windows Components >> Windows Logon Options
- Double-click on Sign-in and Lock Last Interactive User Automatically After a Restart and set it to Enabled (if already enabled, try disabling it).

Enable Sign-in and Lock Last Interactive User Automatically After a Restart - Click Apply/OK, then restart your PC.
- After the restart, check if your login issue is fixed.
You can achieve the same result by disabling the following:
Settings >> Accounts >> Sign-in Options >> Privacy >> Use My Sign-in Info to Automatically Finish Setting up My Device After A
6. Edit the System Registry
Missing accounts can result from incorrect registry settings. You may need to edit some registry keys to get back your login accounts.
Warning: Proceed with caution. Editing your system registry can be risky and might result in permanent damage to your Windows system or your data if done incorrectly.
Open the Registry Editor as an administrator and try these solutions one by one (some keys may not be present for every user). Before starting, make sure to back up your registry.
6.1. Delete Accounts in SpecialAccounts Key
- Navigate to:
HKEY_LOCAL_MACHINE\Software\Microsoft\WindowsNT\CurrentVersion\Winlogon\SpecialAccounts
- Select UserList. Check if your user accounts are listed on the right side.
- If they appear there, delete the account entries and restart your PC to see if the accounts reappear.

Delete the Account in SpecialAccounts
6.2. Disable HideFastUserSwitching
- Navigate to:
Computer\HKEY_LOCAL_MACHINE\SOFTWARE\Microsoft\Windows\CurrentVersion\Policies\System
- Double-click HideFastUserSwitching and set its value to 0.

Disable HideFastUserSwitching - Restart your PC and check if your accounts are restored.
6.3. Disable DontDisplayLastUserName
- Navigate to:
Computer\HKEY_LOCAL_MACHINE\SOFTWARE\Microsoft\Windows\CurrentVersion\Policies\System
- Double-click dontdisplaylastusername and change its value to 0.

Disable dontdisplaylastusername - Close the editor and restart your PC to check if the accounts now appear at login.
6.4. Delete Corrupt Profiles in ProfileList
- Navigate to:
Computer\HKEY_LOCAL_MACHINE\SOFTWARE\Microsoft\Windows NT\CurrentVersion\ProfileList
- Click the first entry under ProfileList in the left pane (usually S-1-5-x), and see if there’s a ProfileImagePath in the right pane. If it’s missing, repeat for each entry under ProfileList until you find all entries without ProfileImagePath.

Check for Profile Image Path - Delete any key (for example, S-1-5-19) that does not have a ProfileImagePath value, and confirm the deletion.

Delete the Key if Profile Image Path is Missing - Restart your PC and see if the user accounts have returned.
6.5. Delete Group Policy Registry Keys
- Go to:
HKEY_LOCAL_MACHINE\Software\Policies\Microsoft
- Right-click the Microsoft key and select Delete.

Delete the Microsoft Key - Confirm the deletion.
- Also delete the Microsoft key at:
HKEY_CURRENT_USER\Software\Policies\Microsoft

Delete the Microsoft Key in HKCU - Delete the Group Policy Objects at:
HKEY_CURRENT_USER\Software\Microsoft\Windows\CurrentVersion\Group Policy Objects

Delete the Group Policy Objects Key - And delete the Policies key at:
HKEY_CURRENT_USER\Software\Microsoft\Windows\CurrentVersion\Policies

Delete the Policies Key - Finally, restart your PC and see if the issue is resolved.
If you still have trouble, consider restoring your system to a previous version of Windows 10, or using System Restore. If that’s not possible, create a Windows 10 installation media (disk or USB) using another computer. Boot from this media and select “Repair Your Computer” (bottom left of the screen) to fix your Windows installation.


